We often want to add an external hard drive to our robots in order to have a dedicated drive for data collection. Having the dedicated drive lets the primary drive remain uncluttered, have less wear-and-tear, split logging between drives for performance, and potentially be a larger spinning disk (as opposed to an expensive SSD). It is also useful when the main hard drive is read only.
(For mechanical mounting skip to the end of this post)
So how should you mount an external hard drive to your robot? There are many tutorials online and resources, however this is how I do it and why (assuming Linux)?
In the /etc/fstab file I add the following line:
/dev/sdb1 /media/data ext4 async,auto,user,exec,suid,rw,nobootwait,noatime 0 0
The /dev/sdb1 needs to be changed based on your hard disk configuration, however typically if you have one primary drive and one external drive, the external will be sdb1. While you can name a drive based on its unique ID, I usually just do it based how the drive appears in /dev. This lets us plug any (one) drive into the computer and let it be used for data collection.
You need to create a location that the hard disk should be mounted to (for you to access it from). So before the above change you should create that mount directory. To make the directory above you can type sudo mkdir /media/data. I generally use Ubuntu, however in other distributions you might want to use sudo mkdir /mnt/data if /media does not exist.
Next is the file system. Generally in a Linux only environment ext4 is used. If you are in a mixed mode where you need to connect to Windows or Mac machines you might want to use vfat.
Now for the options. The options I often use are async,auto,user,exec,suid,rw,nobootwait,noatime
async – Lets data be written to a drive asynchronously. If many cases you might want this to be set to synchronous sync
auto – Mounts drive on boot and/or with mount -a
user – Allows any user to mount this drive
exec – Lets you execute binaries from the drive (might not be needed if you are only writing data)
suid – Allows the user ID to be set when executing a binary (might not be needed if you are only writing data)
rw – Read & Write access to the drive when mounted
nobootwait – Does not interrupt the boot sequence if drive not connected.
noatime – Disables writing file access times to the drive every time you read a file
Depending on the distro I also sometimes add nofail to work with nobootwait.
With the method of mounting the drive above the secondary drive can be auto mounted to the same mount point at boot. If the drive is not present at boot, the boot sequence will not fail. After the computer is up the drive will automatically mount or you might need to type sudo mount -a to mount the drive.
You can see https://wiki.archlinux.org/index.php/Fstab for more information on /etc/fstab.
I spent the top part of this post talking about mounting from the operating system perspective, however some people might get to this page for physical mounting.
There are many ways to mount a hard drive, these range from velcro, to external enclosures, to removable bays.
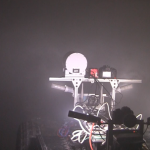
Here is one way to mount a hard disk for removable data drives that I like:


This provides a secure mount that will not let the drive fall out, while also protecting the drive. It also allows for swapping drives as disks get full and we want to log more data. We often fill up a drive and take it offsite to transfer to a server while filling up another drive. This allows us to easily rotate drives.