
Sensor Payload – Hands On Ground Robot Design
by David Kohanbash on April 4, 2022
This post is part of the Hands on Ground Robot Design series. See here for the full list of posts/topics https://robotsforroboticists.com/hands-on-ground-robot–drone-design-series for information on mechanical, electrical, motion control, computing, sensors, and more.
Sensor Selection
Based on the system requirements we determined that we needed RGBD cameras in all four directions to help find required artifacts (survivors, fire extinguishers, cell phones, rope, backpacks, gas, etc…) in all directions. We also wanted thermal sensing for detecting humanoid heat signatures and CO gas sensing for detecting artifacts.
The reason for wanting the depth(D) in addition for RGB was for determining the location of artifacts when near the robot. If the object was far from the robot, we primarily used the Velodyne to determine its position relative to the robot, and then the artifacts position in the global map.
For localization and mapping (SLAM) we needed a Velodyne Puck and an IMU sensor.
In order to process all of that data we decided to use two separate computers. An 8th gen Intel NUC i7 for SLAM and an NVIDIA Xavier for object detection from the cameras.
Other auxiliary hardware was needed to make this payload work. For example LED’s, LuxDrive LED Driver, USB hubs, an ethernet switch, time synchronization hardware and two Vicor DC/DC converters for power conversion/filtering.
The list of sensors selected were:
- Velodyne (VLP-16) Puck
- Xsens MTi-200-VRU-2A8G4 IMU
- Intel RealSense D435 (x4)
- Teledyne FLIR-Boson 640 Thermal Cam (x2)
- UEye UI-3241LE-M/C RGB Cam (x2)
- CozIR®-LP3 1% CO2 Sensor
- Seeed Studio ReSpeaker 107990053 Microphone Array
- Intel Dual Band Wireless-Ac 8265 W/Bt WiFi
Payload Build
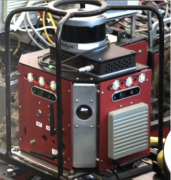
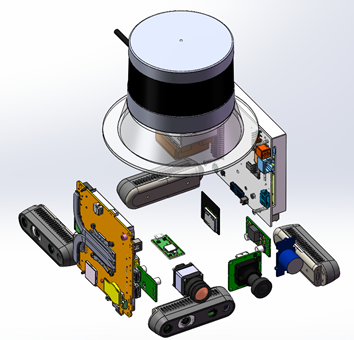
Starting with the first concept image below yielded the final payload shown below. For SLAM reasons we made sure that the IMU was mounted close and rigidly to the Velodyne. We also quickly added a roll cage after some early robot flips during testing to help protect the payload.


If you look in the top right corner of the image you can see a side wall a fan and RealSense camera waiting to be mounted.


Thermal Design / Issues
For thermal reasons we had four fans in the payload. The NUC had its blower attached and we added a fan behind the Xavier. Both of those fans circulated air within the payload. We then had a “push” fan and a “pull” fan mounted at the two sides of the payload to have a constant flow of air flowing through the payload. We had several times during the project where the Xavier kept restarting and we suspected thermal issues. In one of the cases the fan mounted inside near the Xavier failed. In the other cases we found that if the Xavier operates at full memory utilization it can sometimes restart, and the error messages in the log file indicated thermal issues.
Camera Issues
USB Issues
The RealSense cameras had all sorts of issues with not being detected. Often on boot we would have a camera not be detected, then we would reboot and the camera was detected, but another camera was not detected. We ended up figuring out that an older firmware version of the cameras seemed to be more reliable. Using this older firmware, most of the time (but not always) all of the RealSense cameras would be detected on the initial booting of the robot/computer.
Multiple other teams reported similiar RealSense USB issues.
Dust Clouding all Images
Another issue that we fought was the quality of the RealSense camera images when operating in dust and fog while using the LED’s on the payload. When the LED’s were turned on (which was needed in the underground dark environment) the camera images had large specular reflections from the dust particles making the images almost not usable. We eventually stopped using the lights on the payload that were near the cameras. Using lights mounted to the robot that were angles up and off-axis from the cameras produced much better images.
We also tried cleaning particles that might have been stuck in the camera, with limited improvement. Most of the reflections were from suspended particles in the air.

Next Steps
Now that the robot is built the next step is lots, and lots of testing.
I hope you enjoyed this series on how we designed our ground robots for the SubT challenge. Stay tuned for a similiar series on designing drones.
Leave your comments and questions below.

Comments
[…] Now that we have a full robot system designed we will need to start talking about sensors and the sensor payloads in the next post in this series. See here for the next post on the sensor payload design. […]
[…] Sensor Payload – Hands On Ground Robot Design […]